Nothing beats a handmade card that’s sealed with a kiss.
Just in time for the season of gifting, this Christmas we’re doing things a little differently and we’ve decided to take a more hands-on, creative approach. From Spiced Gingerbread Biscuits to feel-good presents that just keep on giving — we’ve covered it all. But, as the countdown to the big day becomes nearer and nearer, sometimes with all the craze of buying gifts and frantically placing each bauble in its designated spot, we begin to forget the small things that matter the most. Cards.
Enter Craft 365, Australia’s largest community that welcomes together both new and old craft enthusiasts. Recently launching their website and app; think of Craft 365 as your one-stop-shop for all your crafting needs. With discounts and exclusive offers on high quality, Australian-made craft materials; members will also gain access to one-off promotions and insider benefits from premium brands, extensive classes, workshops, craft projects and more.
And with Australians taking on a new hobby or two thanks to lockdown restrictions from COVID-19, more than ever before have we longed for getting hands-on, arty and crafty. So, to help you give some inspiration for Christmas 2020 gift ideas that truly come from the heart, we’ve partnered with Craft 365 to teach you how to make an easy pressed flower card for Christmas 2020.
How to Press Flowers and Leaves
TOOLS
Freshly picked flowers and leaves
Baking or parchment paper
Scissors
Tweezers
Iron
-
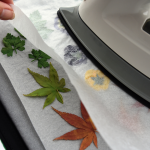
- Craft 365. Ironing. How to press flowers and leaves. Image supplied.
-
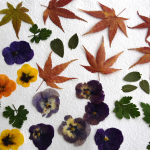
- Craft 365. How to press flowers and leaves. Image supplied.
METHOD
1. Snip off the stems and excess leaves so the flowers will sit flat. Place the flowers and leaves face down onto a sheet of baking paper on a padded solid ironing surface.
2. Check that all petals and leaves are flat and not folded, then place another sheet of baking paper on top.
3. Press with a dry iron (not filled with water) that is set on low to medium. Press down on the flowers rather than moving the iron around.
4. Press down for a few minutes – about five minutes depending on the heat of the iron and the type of flowers and leaves –lifting the iron off every now and then to make sure it is not overheating. Examine the flowers and, if needed, iron a little more.
5. When the flowers are dried out, using tweezers, carefully remove from the baking paper and continue to press the remaining ones. Try not to over dry them and make so brittle that they will shatter; press until dry and papery.
6. Once finished, store your pressed flowers in an airtight container until use. You can use your pressed flowers to make cards, bookmarks or framed pictures. For the more creative, pressed flowers can also be pressed onto candles, inserted into resin or glued onto a journal cover.
Tip: Choose flat flowers that don’t have a thick centre and pick when dry. Avoid fleshy leaves and flowers. Pansies, violas, hydrangeas and those which have petals that can be separated and pressed individually all work well. Autumn leaves, parsley, and ferns are easily pressed too.
How to Make a Pressed Flower Christmas Card
TOOLS
White A4 cardstock
Watercolour paper
Watercolour paints (Koh-I-Nor Brilliant Water Colours)
Brush
Single hole punch
Thread, narrow ribbon or cord
Blue cardstock
Paper trimmer, craft knife and scissors
Double sided tape or tape runner
Pressed flowers or leaves of your choice
Craft glue and toothpick
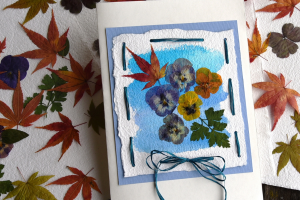
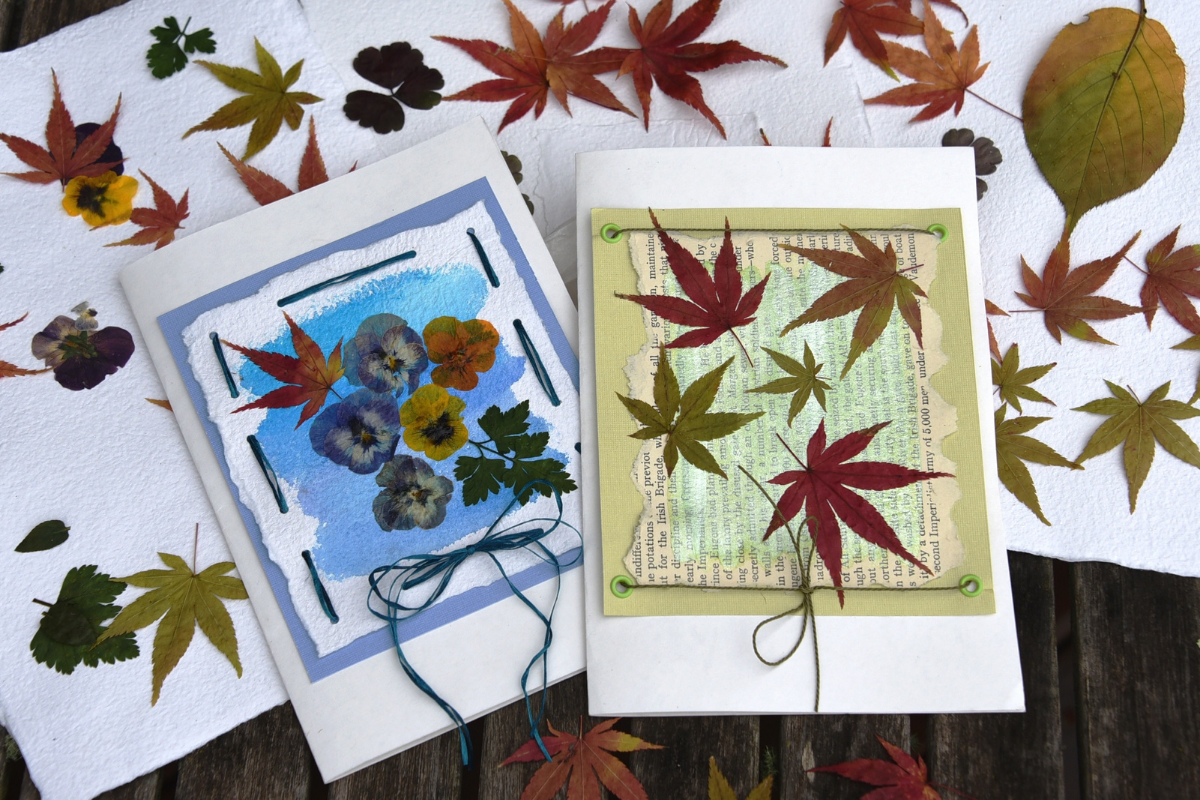
Craft 365. Easy Guide. How to make a pressed flower card for Christmas 2020. Image supplied.
METHOD
1. Fold an A4 piece of white cardstock in half. Set aside.
2. To make the watercolour layer, tear a piece of watercolour paper at approximately 11.5-centimetres x 13.5-centimetres.
3. Paint a splodge in the centre in a selection of blues or your desired festive colours. Allow to dry. If the paper bubbles, iron it flat by covering it with parchment paper.
4. Punch a hole in each corner, then punch two holes in the lower edge equally spaced between the corners, then two on the top edge between the corners and then four on each side between the corners.
5. Starting at one of the centre bottom edge holes, insert the blue thread, ribbon or cord through the holes, around the card and tie a bow at the bottom edge as pictured.
6. To make the blue background, cut a piece of blue coloured cardstock at 13.5-centimetres x 15.5-centimetres.
7. Then, using double sided tape, attach the watercolour paper to the centre of the blue cardstock, and then tape the cardstock to the card, 2.5-centimetres from the top edge.
8. Arrange your pressed flowers or leaves to your desired assortment and glue in place using a small amount of craft glue applied with a toothpick. Allow to dry.
9. When finished, be sure to write your festive message inside and be sure to seal it with a kiss!
For more information and to discover what you can create, visit the Craft 365 website.